神经网络搭建准备内容
数据集
In [1]:
1 | import sys, os |
In [2]:
1 | def img_show(img): |
In [3]:
1 | (x_train, t_train), (x_test, t_test) = load_mnist(flatten=True, normalize=False) |
In [4]:
1 | t_train # 标签数组 |
Out[4]:
1 | array([5, 0, 4, ..., 5, 6, 8], dtype=uint8) |
In [5]:
1 | x_train.size # 图像 |
Out[5]:
1 | 47040000 |
In [6]:
1 | x_train[0].size |
Out[6]:
1 | 784 |
In [7]:
1 | img = x_train[0] |
In [8]:
1 | print(img.shape) # (784,) |
In [9]:
1 | img_show(img) |
神经网络的推理处理
In [10]:
1 | import pickle |
In [11]:
1 | def softmax(a): |
In [12]:
1 | def get_data(): |
In [13]:
1 | def init_network(): |
In [14]:
1 | def predict(network, x): |
In [15]:
1 | x, t = get_data() |
In [16]:
1 | accuracy_cnt = 0 |
利用批处理实现
In [17]:
1 | batch_size = 100 # 批数量 |
In [18]:
1 | for i in range(0, len(x), batch_size): |
In [19]:
1 | # argmax的test |
损失函数
In [1]:
1 | # 均方误差 |
mini-batch学习
In [2]:
1 | import sys, os |
In [3]:
1 | (x_train, t_train), (x_test, t_test) = load_mnist(one_hot_label=True, normalize=True) # 注意这里把标签变成0,1vector形式了 |
In [4]:
1 | train_size = x_train.shape[0] |
In [5]:
1 | batch_mask # 随机的10个数 |
Out[5]:
1 | array([57147, 30041, 12057, 53543, 31076, 33940, 43334, 28835, 9675, |
In [6]:
1 | t_batch # 对应取的标签 |
Out[6]:
1 | array([[0., 0., 0., 0., 0., 0., 1., 0., 0., 0.], |
这里补充一下,对于矩阵取行vector的操作
In [7]:
1 | m = np.array([[1,2],[3,4],[5,6],[7,8],[9,10]]) |
Out[7]:
1 | array([[3, 4], |
mini-batch版交叉熵实现
In [8]:
1 | def cross_entropy_error_minibatch_onehot(y, t): # y是神经网络输出,t是监督数据(标签的one-hot) |
解释为什么单个数据要特殊转换一下
In [9]:
1 | p = np.array([1,2,6,6,5,8,4,4]) |
Out[9]:
1 | 8 |
In [10]:
1 | p = p.reshape(1, p.size) |
Out[10]:
1 | 1 |
监督数据不是one-hot而是标签形式
In [11]:
1 | def cross_entropy_error_minibatch(y, t): # y是神经网络输出,t是监督数据(标签) |
补充对于矩阵取特定元素:取某行的第某个
In [12]:
1 | m = np.array([[1,2],[3,4],[5,6],[7,8],[9,10]]) |
Out[12]:
1 | array([4, 8]) |
梯度的计算
In [1]:
1 | import numpy as np |
In [2]:
1 | def _numerical_gradient_no_batch(f, x): # 单组(一行)数值的梯度计算 |
演示
In [3]:
1 | _numerical_gradient_no_batch(function_2, np.array([5.0, 6.0])) |
Out[3]:
1 | array([10., 12.]) |
处理含矩阵参数的梯度
In [4]:
1 | #利用类定义的目标函数,或者是取巧的二元二次分开函数 |
演示np.nditer(详见https://blog.csdn.net/TeFuirnever/article/details/90311099 )
In [5]:
1 | x = np.arange(6).reshape(2,3) |
演示enumerate
In [6]:
1 | bar = np.array([[1,2],[3, 5],[8,9]]) |
Out[6]:
1 | [(0, array([1, 2])), (1, array([3, 5])), (2, array([8, 9]))] |
In [7]:
1 | for idx,x in enumerate(bar): |
梯度图像
In [8]:
1 | if __name__ == '__main__': |

神经网络的梯度
In [9]:
1 | import sys, os |
In [10]:
1 | class simpleNet: |
小测试
In [11]:
1 | net = simpleNet() |
In [12]:
1 | x = np.array([0.6, 0.9]) |
Out[12]:
1 | array([ 0.08743891, 0.34277403, -1.05934874]) |
In [13]:
1 | np.argmax(p) #找最大标签 |
Out[13]:
1 | 1 |
In [14]:
1 | t = np.array([0,0,1]) |
Out[14]:
1 | 2.105581228438146 |
In [15]:
1 | def f(W): |
Out[15]:
1 | array([[ 0.23001268, 0.29692202, -0.5269347 ], |
两种处理含矩阵参数梯度的方法是一样的
In [16]:
1 | if (dW1 == dW2).all(): |
lambda函数的解释( https://blog.csdn.net/weixin_43971252/article/details/109066536 )
In [17]:
1 | # 注意python语言特性 |
Out[17]:
1 | 3 |
解释梯度场的代码
对于meshgrid附上链接 https://www.cnblogs.com/jingxin-gewu/p/13563783.html
In [18]:
1 | x0 = np.arange(-2, 2, 1) |
In [19]:
1 | X |
Out[19]:
1 | array([[-2, -1, 0, 1], |
In [20]:
1 | Y |
Out[20]:
1 | array([[-2, -2, -2, -2], |
flatten是降维
In [21]:
1 | X = X.flatten() |
In [22]:
1 | X |
Out[22]:
1 | array([-2, -1, 0, 1, -2, -1, 0, 1, -2, -1, 0, 1, -2, -1, 0, 1]) |
In [23]:
1 | Y |
Out[23]:
1 | array([-2, -2, -2, -2, -1, -1, -1, -1, 0, 0, 0, 0, 1, 1, 1, 1]) |
In [24]:
1 | Z = np.array([X, Y]) |
In [25]:
1 | for idx,x in enumerate(Z): |
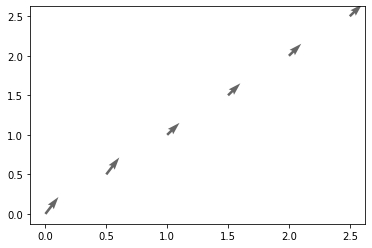
接下来是矢量图,参数具体见https://blog.csdn.net/liuchengzimozigreat/article/details/84566650
In [26]:
1 | x = np.arange(0, 3, 0.5) |
Out[26]:
1 | <matplotlib.quiver.Quiver at 0x16af9f8c970> |

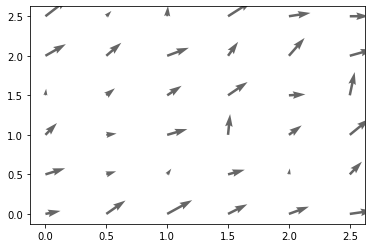
看上图其实是单点的矢量,如果要绘制矢量场则要对输入的点进行处理,也就是先meshgrid然后flatten
In [27]:
1 | X, Y = np.meshgrid(x, y) |
Out[27]:
1 | <matplotlib.quiver.Quiver at 0x16af9ff5f40> |

All articles in this blog are licensed under CC BY-NC-SA 4.0 unless stating additionally.
Comment
ValineDisqus


